

Small Clinics
Interpreting Pulse Oximeter Readings: A Clinical and Operational Guide
A practical guide for Indian healthcare professionals on interpreting SpO2, pulse rate, and perfusion index from oximeter readings. Learn about accuracy and common errors.


As a non-invasive cornerstone of patient monitoring, the pulse oximeter provides critical data at the bedside, in the outpatient department (OPD), and across various clinical settings. Obtaining a numerical value is simple; the real clinical skill lies in correctly interpreting these oximeter readings, understanding their limitations, and knowing when a number reflects a true physiological state versus an artefact.
This guide moves beyond the basic function of the device to focus on the practical interpretation of its three key metrics: SpO2, Pulse Rate (PR), and Perfusion Index (PI). We will cover the standard protocols for ensuring accuracy, common sources of error, and the clinical decision-making that follows.
Decoding the Core Metrics: SpO2, PR, and PI
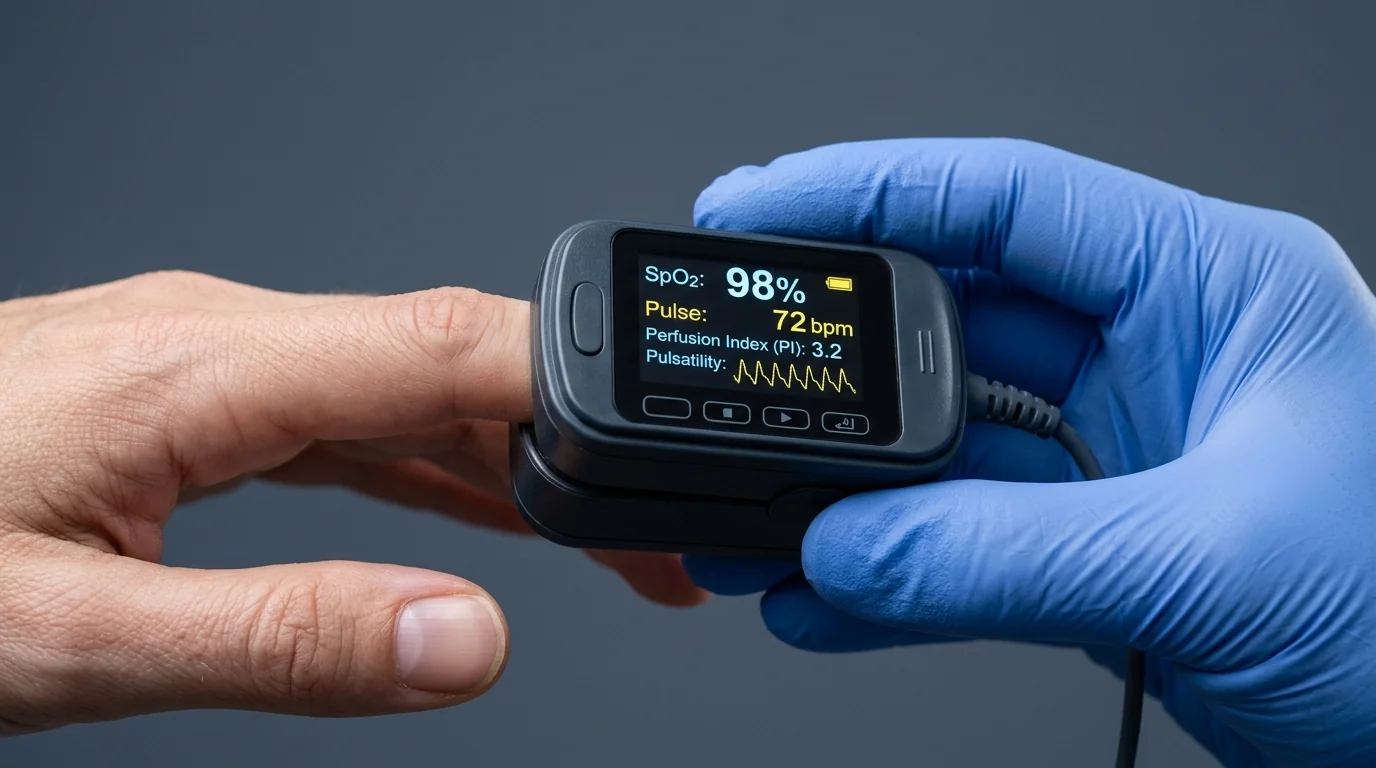 A pulse oximeter reading provides more than just the oxygen saturation. A complete interpretation involves assessing all the data points provided.
SpO2 (Peripheral Capillary Oxygen Saturation): The Primary Indicator SpO2 is an estimate of the amount of oxygen-carrying haemoglobin in the blood, expressed as a percentage. It is the most critical parameter for assessing a patient's oxygenation status.
SpO2 Interpretation Bands
| SpO2 Range | Clinical Significance |
| 95% - 100% | Normal for a healthy individual. |
| 91% - 94% | Mild Hypoxemia. Warrants clinical assessment and monitoring. |
| 86% - 90% | Moderate Hypoxemia. Intervention is often required. |
| < 85% | Severe Hypoxemia. A critical finding requiring immediate action. |
It's crucial to note that target SpO2 ranges can be lower for patients with chronic respiratory conditions like COPD, where a baseline of 88-92% may be acceptable. Always refer to the patient's specific treatment goals.
Pulse Rate (PR): A Vital Sign in Context The device also measures the pulse rate in beats per minute (bpm). This should correlate closely with a manually palpated pulse. It must always be interpreted in the context of the patient's age, condition, and medications.
Normal Resting Pulse Rate by Age
| Age Group | Normal PR (bpm) |
| Neonates (0-1 mo) | 100 - 205 |
| Infants (1-12 mo) | 100 - 180 |
| Children (1-10 yr) | 60 - 140 |
| Adults (>10 yr) | 60 - 100 |
Tachycardia (high PR) or bradycardia (low PR) should be assessed alongside other vitals like blood pressure, temperature, and respiratory rate.
Perfusion Index (PI): Gauging Signal Quality The PI is a numerical representation of the pulsatile blood flow strength at the sensor site. It is not a direct measure of systemic perfusion but an essential indicator of the reliability of the SpO2 reading.
- PI > 1.0%: Indicates a strong, regular pulse signal. The SpO2 reading is likely to be accurate.
- PI < 0.4%: Suggests a weak pulse signal. The SpO2 reading may be unreliable. This can be caused by cold extremities, hypotension, peripheral vascular disease, or incorrect probe placement.
If the PI is low, the first step is to troubleshoot the signal (e.g., warm the patient's hand, reposition the probe) before questioning the SpO2 value.
The Protocol for an Accurate Oximeter Reading
Inaccurate readings lead to flawed clinical decisions. Adhering to a standardised procedure is non-negotiable for reliable patient monitoring.
Step-by-Step Procedure:
- Patient Preparation: Ensure the patient has been at rest for at least five minutes to establish a baseline. The hand should be warm, relaxed, and positioned at heart level.
- Site Selection: The index or middle finger is preferred. Ensure the finger is clean and dry. Avoid using a finger on an arm with an inflated blood pressure cuff, an arterial line, or an IV infusion.
- Remove Interferences: Nail polish, especially dark colours like black, blue, or green, must be removed. Artificial nails can also block light transmission and should be removed if possible.
- Probe Application: Insert the finger completely into the probe. It should be snug but not constricting. The LED light emitter and the photodetector must be aligned directly opposite each other over the fingertip.
- Allow for Stabilisation: After turning the device on, wait for the readings to stabilise. This typically takes 10-30 seconds. A stable, uniform plethysmograph (pleth) waveform on the display is the best confirmation of a good signal.
- Record the Reading: Once the SpO2 and PR values are stable for at least five seconds, record them. A dependable device like the Contec Fingertip Pulse Oximeter provides a clear display that helps confirm signal stability before documentation.
- Interpret in Context: Never treat the number in isolation. Correlate the reading with the patient's clinical presentation.
Common Sources of Error and Troubleshooting
An anomalous reading is often due to a correctable error. Systematically ruling these out is a key clinical skill.
Patient-Related Factors:
- Motion Artefact: The most frequent cause of inaccurate readings. Shivering, tremors, or any patient movement can disrupt the sensor's ability to detect a stable pulse.
- Poor Perfusion: Low blood pressure, hypothermia, cardiac shock, or the use of vasoconstrictor medications can weaken the peripheral pulse, resulting in a low PI and an unreliable or unobtainable reading.
- Severe Anemia: While the saturation percentage may be normal, the total oxygen content of the blood is low. The oximeter reading can be misleadingly high.
- Dyshemoglobinemias: Standard pulse oximeters cannot distinguish carboxyhemoglobin (from carbon monoxide poisoning) or methemoglobin from oxyhemoglobin. This can result in a falsely high SpO2 reading in affected patients.
External and Device-Related Factors:
- Improper Probe Placement: If the probe is too loose, misaligned, or too tight, the reading will be compromised.
- Ambient Light: Intense overhead surgical lights or direct sunlight can sometimes interfere with the photodetector. Shielding the probe with a cloth can help.
- Nail Polish and Artificial Nails: As mentioned, these physically obstruct the light path.
- Device Quality: For spot checks in a busy ward or clinic, using a device known for its signal processing capabilities, such as the ChoiceMMed OxyWatch Fingertip Pulse Oximeter, is critical for efficiency and accuracy. Equipping each crash cart and nursing station with a reliable fingertip pulse oximeter from a trusted source ensures consistent performance.
When to Escalate: Interpreting Low Oximeter Readings
A low SpO2 value demands a structured response, beginning with verification.
- First, Rule Out Error: Before initiating any intervention, re-check the basics. Is the probe positioned correctly? Is the patient's hand warm? Is the PI adequate? Try a different finger or the other hand.
- Next, Assess the Patient: Look at the patient, not just the monitor. Are they exhibiting signs of respiratory distress? Check for tachypnea, use of accessory muscles, cyanosis, or a change in mental status. A stable patient with an odd reading is likely an artefact; a distressed patient with a corresponding low reading is a medical emergency.
Actionable Thresholds (General Guidelines):
- SpO2 91-94%: Re-assess the patient's respiratory status. Ensure they are positioned upright to maximise lung expansion. Consider the cause. If the patient is post-operative, it could be atelectasis. If they have pneumonia, it indicates disease severity. Supplemental oxygen may be required based on clinical judgement.
- SpO2 < 90%: This signifies significant hypoxemia. This is a critical alert that requires immediate intervention.
- Administer oxygen according to facility protocol.
- Alert the responsible medical officer immediately.
- Place the patient on continuous monitoring. For these situations, a simple spot-check device is insufficient. A system like the Doctroid Table Top Pulse Oximeter is essential for tracking trends and setting alarms in an ICU, high-dependency unit, or operating theatre.
Operational Considerations for Your Facility
Effective use of pulse oximetry extends beyond the clinician to institutional practices.
- Standardisation and Training: Standardising the models of oximeters used in different departments simplifies training for clinical staff on proper use, cleaning, and basic troubleshooting. Regular competency checks are essential.
- Infection Control: Probes are a potential vector for cross-contamination. A strict protocol for cleaning probes between each patient using an approved disinfectant is mandatory.
- Procurement and Lifecycle Management: When selecting devices, procurement managers must consider not just the initial specification but also the durability of probes, battery life for portable units, and the clarity of the display. Planning for the entire lifecycle, including sourcing replacement probes and accessories, is key. Exploring a comprehensive catalogue of Medicalequipments allows for informed comparisons based on departmental needs, ensuring both clinical suitability and operational efficiency.
Equip Your Facility Today
Accurate and well-interpreted oximeter readings are fundamental to patient safety and effective clinical care. Ensuring your teams are equipped with reliable devices and are proficient in their use is a critical operational responsibility.
For sourcing dependable pulse oximeters, from fingertip models for routine checks to advanced tabletop monitors for critical care environments, explore the comprehensive range available on MedikaBazaar.
FAQs

