

Dentist
Evaluating the Dental Airotor Handpiece: A Clinical and Operational Guide
An expert guide for procurement managers on selecting and maintaining a dental airotor handpiece. Covers key specs, chuck types, sterilization, and operational factors.


As the primary instrument for most restorative and endodontic procedures, the high-speed dental airotor handpiece is arguably the most frequently used piece of active dental equipment in any clinic. Its performance directly impacts clinical efficiency, patient comfort, and procedural outcomes. For any procurement head or senior clinician, selecting the right airotor is not just about initial specifications; it’s a decision that affects operatory workflow, maintenance schedules, and long-term operational viability.
This guide moves beyond a simple features list. We'll break down the critical mechanical, ergonomic, and safety parameters to consider when evaluating an airotor handpiece for institutional use. The goal is to equip you with the operational knowledge to source a device that is not only clinically effective but also durable and reliable under the demanding caseload of a modern Indian practice.
The Core Mechanics: Understanding Air-Driven Turbine Technology
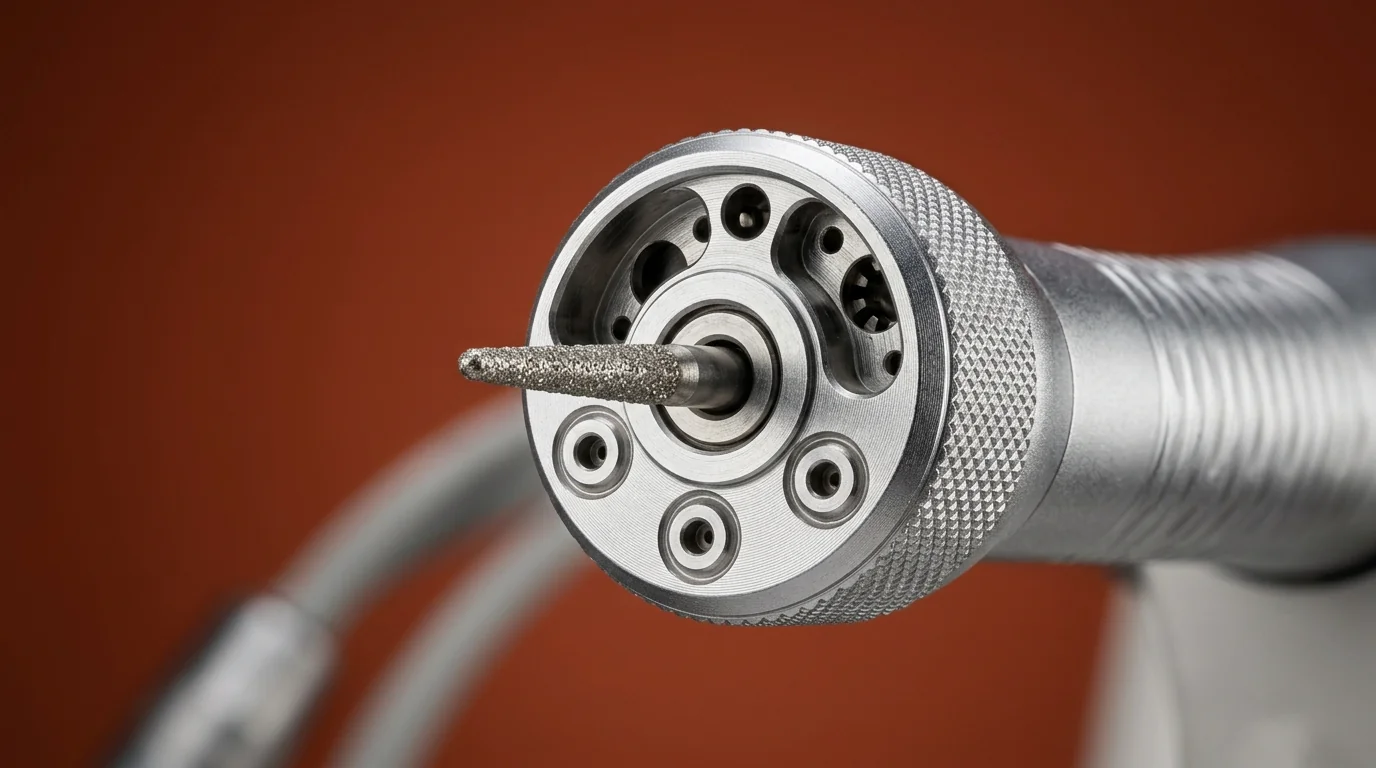 At its heart, the airotor is a precision-engineered air turbine. Compressed air from the dental unit is channelled through the handpiece body, spinning a small turbine-impeller assembly housed in the head. This assembly, which holds the dental bur, can achieve rotational speeds between 300,000 and 450,000 RPM. This incredible speed allows for rapid and smooth cutting of hard tissues like enamel and dentin.
It's crucial to distinguish this from a low-speed micromotor handpiece. While a micromotor provides high torque at low speeds (up to 40,000 RPM) for tasks like caries removal and polishing, the airotor is the designated tool for bulk tissue reduction, such as cavity preparation, crown cutting, and sectioning teeth for extractions.
The key components that determine its performance and longevity include:
- The Turbine Cartridge: The engine of the handpiece, containing the impeller and bearings. This is typically a user-replaceable component.
- The Chuck Mechanism: The system that grips and holds the bur securely.
- Spray Ports: Nozzles that deliver a precise air/water coolant spray to the treatment site.
- Coupling: The interface that connects the handpiece to the dental unit's tubing.
Key Specifications for Clinical and Procurement Evaluation
When assessing a new dental handpiece, look past the marketing and focus on these core operational metrics. Each factor presents a trade-off between performance, ergonomics, and maintenance overhead.
Speed, Torque, and Power
While high RPM is the headline feature, it's operationally meaningless without sufficient torque. Torque is the rotational force that keeps the bur spinning when it meets the resistance of tooth structure. A handpiece with high speed but low torque will stall easily, leading to inefficient "feathering" of the instrument, increased chair time, and excessive heat generation.
- Speed (RPM): Most modern airotors operate in the 350,000-420,000 RPM range. This is more than adequate for all clinical applications.
- Power (Watts): Power, measured in watts, is a more practical indicator of cutting performance than RPM alone. It represents the combination of speed and torque. A handpiece with 20-25 watts of power will feel significantly more capable during demanding procedures like crown removal than one with 15-18 watts.
Head Design: Access vs. Power
The size of the handpiece head is a critical ergonomic factor.
- Standard Head: Offers the most power due to a larger turbine. It's the workhorse for most routine procedures in the posterior region.
- Miniature/Pedo Head: Provides superior access and visibility, especially in paediatric patients, patients with limited opening (trismus), or for work on third molars. The trade-off is a smaller turbine, resulting in slightly less torque and power.
Chuck Mechanism and Bur Retention
The chuck is the component responsible for holding the bur. Failures here can be a significant safety and operational issue.
- Friction Grip (FG): An older system requiring a special tool to insert or remove the bur. It is less common in modern handpieces.
- Push-Button Chuck: This is the current standard. It allows for quick, single-action bur changes, significantly improving workflow efficiency. When evaluating, assess the force required to actuate the button and the perceived security of the grip. A high-quality chuck mechanism is vital for preventing bur slippage during procedures.
Bearing Material: Ceramic vs. Steel
The bearings are the most critical wear-and-tear component within the turbine. The material choice directly impacts the handpiece's lifespan and maintenance requirements.
- Steel Bearings: The traditional choice. They are robust but generate more friction and heat, requiring meticulous and frequent lubrication.
- Ceramic Bearings: Increasingly the standard for high-performance handpieces. They are significantly harder than steel, lighter, and have a lower coefficient of friction. This means they run cooler, require less lubrication, are quieter, and have a substantially longer operational life, reducing long-term service costs.
Illumination Systems
Proper illumination of the operating field is non-negotiable. Integrated lighting transforms clinical precision, especially in the posterior quadrants.
- Fiber Optic: Delivers light from an external source (in the dental unit) through glass fibers embedded in the handpiece and coupler. The light quality is good, but the fibers can degrade over time, leading to dimming.
- LED Illumination: The superior modern option. LEDs are brighter, produce a whiter, daylight-calibrated light, and are far more durable. Many, like the Medtech LED Airotor High-Speed Handpiece, feature a self-generating dynamo system. An internal generator uses the drive air to power the LED, eliminating the need for a fiber optic system in the dental chair tubing. This makes it a plug-and-play upgrade for any standard dental unit.
Coolant Spray System
Effective cooling is essential to prevent thermal damage to the pulp. The number and arrangement of spray ports matter.
- Single-Port Spray: Basic, but can be easily obstructed by the tooth, leading to inefficient cooling.
- Multi-Port Spray (3 or 4 Ports): This is the clinical standard of care. Multiple jets of water surround the bur, ensuring that at least one stream is always effectively cooling the cutting surface, regardless of the handpiece's orientation. This also provides better flushing of debris.
Airotor vs. Surgical Drill: A Critical Distinction
While both are rotary instruments, an airotor must not be confused with a dedicated surgical drill used for implantology or oral surgery. A surgical drill is a low-speed, high-torque instrument (typically 20-2,000 RPM) designed to be used with sterile saline external irrigation. An airotor's internal air/water spray is not sterile and expels air into the surgical site, which can create a risk of surgical emphysema. For sterile bone-cutting procedures, a specific surgical handpiece is mandatory.
Maintenance and Sterilization: The Key to Longevity
Improper maintenance is the primary cause of premature airotor failure. Adhering to a strict protocol is essential for protecting your investment and ensuring patient safety.
- External Cleaning: Immediately after use, scrub the handpiece under running water with a soft brush to remove all visible bio-burden. Do not immerse the entire handpiece.
- Internal Flushing: Use a cleaning solution recommended by the manufacturer to flush the air and water lines. This removes internal debris that could clog the spray ports or damage the turbine.
- Lubrication: This is the single most important step. Using a high-quality handpiece lubricant with the correct nozzle adapter, spray lubricant into the drive air tube for 2-3 seconds, or until clean oil emerges from the handpiece head. This purges contaminants and protects the bearings. This must be done before every sterilization cycle.
- Sterilization: Place the lubricated handpiece in a sterilization pouch. Autoclave at 134°C according to the manufacturer's validated cycle time. Do not use chemical sterilization or cold sterile solutions, as they will damage the internal components.
- Post-Sterilization: Allow the handpiece to cool and dry completely before use. Running a wet handpiece can cause rapid bearing corrosion.
Equip Your Facility Today
Making the right choice in a dental airotor handpiece involves a careful balance of clinical needs, ergonomic preferences, and long-term operational costs. By focusing on key performance indicators like power, bearing quality, and illumination, and committing to a rigorous maintenance protocol, you can ensure your practice is equipped with reliable, high-performing instruments. For a comprehensive selection of dental handpieces and other essential equipment, explore the curated catalogues on MedikaBazaar to find instruments that meet your facility’s specific clinical and budgetary framework.
FAQs

